
As the crisp autumn air settles in and the leaves begin to turn, your front porch becomes the focal point of seasonal curb appeal. Hardy cold-weather staples like potted mums, flowering kale, and ornamental peppers bring vibrant warmth to exterior entryways, but display-ready nursery plastic rarely matches the cozy aesthetic of the season.
The challenge? Standard store-bought planters often deteriorate quickly in damp fall conditions, while heavy DIY planters built with bulky exterior screws leave visible, counter-bored holes that compromise clean miter lines. For cedar trim and slat builds, traditional hand hammering risks splitting thin stock and loosening tight corners. Modern woodworkers and weekend DIYers are increasingly trading sluggish hand nailing for lightweight, exterior-ready 18-gauge brad nailers; achieving tight, invisible joints without splitting fine grain.
Here is how to craft an elegant, weather-resilient cedar planter tailored for front porch displays, built to handle shifting autumn moisture with zero fuss.
Materials & Tools Checklist
Lumber (Naturally Rot-Resistant Cedar)
-
2x2 Cedar boards:
-
4 corner posts @ 18" (Adjust length to add height to the planter as an alternative option)
-
2 bottom shelf cleat supports @ 16"
-
1x6 Cedar boards:
-
12 horizontal side slats @ 18" (3 boards per side × 4 sides)
-
3 bottom floor slats @ 16" (for inner drainage floor)
Additional Supplies & Tools
-
Miter saw or circular saw
-
Tape measure and carpenter’s square
-
Two 1" thick scrap wood spacer blocks
-
120-grit sandpaper
-
Landscape fabric / geotextile liner (to prevent soil loss through gaps)
-
Exterior penetrating wood stain or sealer (warm cedar/chestnut finish)
-
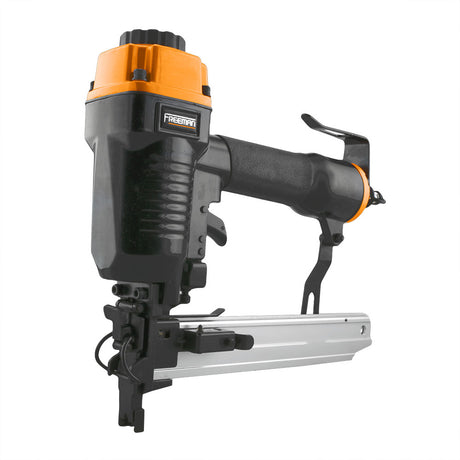
Freeman PE20V2118G2 20V Cordless 18-Gauge 2-in-1 Nailer & Stapler
-
18-Gauge outdoor-rated (galvanized or stainless steel) brad nails (1-1/4" and 1-3/4") or 1/4" narrow crown staples
-
Exterior-grade wood glue (Type III waterproof, e.g., Titebond III)
Step-by-Step Build Guide

Step 1: Prep and Cut
-
Measure and cut all lumber according to the cut list using a miter saw.
-
Sand down cut ends and broad faces with 120-grit sandpaper to remove any mill marks or sharp splinters.
Cut List
|
Piece |
Lumber Size |
Finished Length |
Quantity |
Purpose |
|
Corner Posts |
2x2 |
18" |
4 |
Internal vertical frame (Adjust length to add height as an alternative option) |
|
Side Slats |
1x4 |
18" |
12 |
Outer slotted walls (3 per side) |
|
Floor Cleats |
2x2 |
16" |
2 |
Bottom support runners |
|
Bottom Slats |
1x6 |
16" |
3 |
Slotted drainage floor |
Step 2: Assemble Side Panels 1 and 2 (Opposite Faces)
-
Lay two 18" corner posts flat on your work surface parallel to one another, spaced approximately 14" apart.
-
Position the first 18" side slat flush with the top ends and outside edges of the posts.
-
Apply a dab of exterior wood glue at each contact point.
-
Load the Freeman PE20V2118G2 with 1-1/4" fasteners. Fire 2 to 3 fasteners per joint through the slat into each corner post.
-
Place your two 1" spacer blocks directly beneath the first board. Butt the second 1x4 slat firmly against the spacers to guarantee an exact 1" gap across the middle. Fasten with the Freeman tool.
-
Insert the 1" spacers below the second slat and position the bottom 1x4 slat flush with the bottom of the posts. Fasten securely.
-
Repeat this exact process for the opposite panel using the remaining two 18" corner posts and three more 1x4 slats.

Step 3: Connect Panels into an 18" Cube
-
Stand the two assembled panels upright on a level work table.
-
Set an 18" slat across the top of the two open sides, overlapping the edge of the adjacent side boards at a 90° angle.
-
Glue and tack the top board in place with the Freeman nailer/stapler.
-
Using the 1" spacer blocks, position and fasten the middle slat and bottom slat on both remaining open faces. Check that the entire frame is square using a carpenter's square.
Step 4: Install Floor Cleats and Slotted Bottom
-
Flip the planter box upside down or reach inside through the top.
-
Place the two 16" 2x2 floor cleats horizontally along opposite interior walls, positioned flush with the top edge of the bottom side boards.
-
Fasten each cleat to the corner posts and side slats using glue and 1-3/4" brad nails fired at a slight angle.
-
Set the three 16" bottom slats across the cleats.
-
Space the three bottom slats evenly to leave two uniform 1" gaps between them for bottom water drainage.
-
Glue and drive fasteners through the top of the floor slats into the cleats below.

Step 5: Sanding and Finishing
-
Sand any exposed corners and transitions flush.
-
Wipe away sawdust with a tack cloth or rag.
-
Apply an exterior UV- and moisture-resistant penetrating wood oil or semi-transparent stain to highlight the rich cedar grain while protecting against weathering.
-
Line the interior with breathable landscape fabric secured with staples along the upper cleat line before filling with soil or placing potted plants directly inside.
Upgrade Your DIY Workshop

PE20V2118G2 - 20V Cordless 2-in-1 Brad Nailer / Stapler
Whether framing outdoor decor, pinning architectural trim, or securing seasonal cedar work, this cordless platform gives you complete mobility, non-marring fastening power.