
Choosing the right flooring fastener can make the difference between a stable, professional-looking hardwood floor and one that develops squeaks, loose boards, or damaged tongues over time. Whether you're installing solid oak, engineered hardwood, or strand-woven bamboo, understanding flooring cleats vs. staples and selecting the right flooring nailer is essential for a successful installation.
As temperatures drop and renovation projects move indoors, homeowners and flooring contractors are preparing to upgrade their spaces with new hardwood floors. But before you begin, there are a few important questions to answer: What gauge flooring fastener should you use? Can you install hardwood flooring with a regular brad nailer? How do you choose the correct flooring nailer for your plank thickness?
In this guide, we'll break down the differences between flooring cleats and staples, explain which fasteners work best for different flooring materials, and share practical installation tips to help you achieve a secure, long-lasting floor.
Quick Answer: Are Flooring Cleats or Staples Better?
Neither flooring cleats nor staples are universally better. The right choice depends on your flooring material, plank thickness, wood species, subfloor, and the installation instructions provided by your flooring manufacturer.
-
Flooring cleats: Often preferred for many solid hardwood installations because their barbed shanks provide holding power while allowing some natural seasonal movement.
-
Flooring staples: Commonly used for compatible solid hardwood flooring systems and can provide strong holding power when the correct staple and installation method are used.
-
18-gauge L-cleats: Useful for compatible thinner engineered hardwood, dense hardwood, and strand-woven bamboo applications.
-
15.5-gauge flooring staples and 16-gauge flooring cleats: Common options for compatible solid hardwood installations, particularly flooring within the thickness range specified by the tool manufacturer.
Always follow the flooring manufacturer's fastening specifications. Fastener size, shape, length, and spacing matter just as much as gauge.

1. What Is the Difference Between Flooring Cleats and Staples?
Flooring cleats and flooring staples are both designed to secure compatible tongue-and-groove flooring boards to an approved subfloor. However, their shapes and installation characteristics differ.
What Are Flooring Cleats?
Flooring cleats are specialized nails with a shaped head and a serrated or barbed shank. They are driven at an angle through the tongue of the flooring board, securing the board to the subfloor while keeping the fastener concealed beneath the next plank.
Many flooring cleats have a design that helps resist withdrawal while accommodating some natural movement in the wood.
Benefits of flooring cleats include:
-
Strong holding power when correctly matched to the flooring.
-
Concealed fastening for a clean finished surface.
-
Compatibility with many solid hardwood and engineered flooring systems.
-
Options in different gauges and lengths for specific flooring applications.
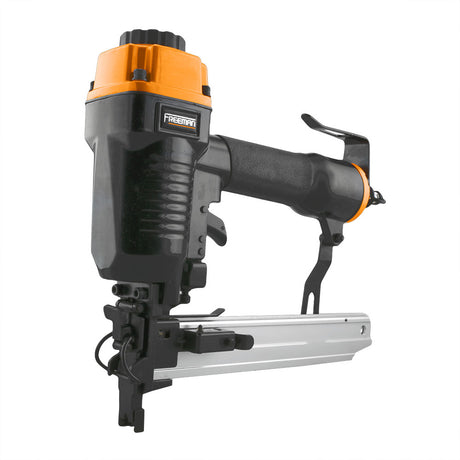
For example, Freeman's PF18GLCN 18-Gauge L-Cleat Flooring Nailer is designed for compatible tongue-and-groove flooring from 3/8-inch to 3/4-inch thick, including engineered flooring and dense woods such as strand-woven bamboo.
What Are Flooring Staples?
Flooring staples are U-shaped fasteners with two legs connected by a crown. A specialized flooring stapler drives the legs into the flooring tongue and subfloor at the prescribed angle.
Staples are popular for compatible hardwood installations because they provide two points of penetration and can offer strong fastening performance.
Benefits of flooring staples include:
-
Strong holding power in approved flooring applications.
-
Efficient installation across large flooring areas.
-
Compatibility with many solid hardwood flooring products.
-
Availability in specific gauges, crown widths, and lengths.
However, staples are not appropriate for every flooring product. Some flooring manufacturers specify cleats because the geometry of a staple can increase the risk of splitting a brittle or narrow tongue.
Flooring Cleats vs. Staples: Comparison Chart
| Feature | Flooring cleats | Flooring staples |
|---|---|---|
| Fastener shape | Shaped nail with a barbed shank | U-shaped fastener with two legs |
| Holding mechanism | Shank engages the flooring and subfloor | Two legs provide fastening points |
| Best use | Flooring systems approved for the selected cleat | Flooring systems approved for the selected staple |
| Tongue-splitting risk | Depends on gauge, length, wood, and placement | Depends on staple dimensions, wood, and placement |
| Installation tool | Compatible flooring nailer | Compatible flooring stapler or combination tool |
| Seasonal movement | Depends on flooring system and installation | Depends on flooring system and installation |
The bottom line: Don't select a fastener based on its shape alone. Check the flooring installation manual first, then select a compatible flooring nailer or stapler.

2. What Gauge Should You Use for Engineered Hardwood Flooring?
One of the most common flooring installation questions is: What gauge fastener should I use for engineered hardwood?
The answer depends on the thickness and construction of the flooring, the tongue design, and the manufacturer's approved fastening method.
Engineered hardwood consists of a real wood wear layer attached to a multi-layer core. Its construction can differ significantly between products, meaning a fastener that works well with one engineered floor may damage another.
When Is an 18-Gauge Flooring Cleat Appropriate?
An 18-gauge L-cleat is a potential option for engineered flooring when the manufacturer approves that fastener type and size.
Freeman's PF18GLCN is designed for compatible tongue-and-groove flooring measuring 3/8 inch to 3/4 inch thick. It accepts 18-gauge glue-collated L-cleats from 1-1/4 inches to 1-3/4 inches and includes interchangeable no-mar base plates for different flooring thicknesses.
The smaller fastener profile can be useful for certain thinner or denser flooring materials where a larger fastener could increase the risk of tongue damage.
Learn more about the Freeman PF18GLCN Flooring Nailer.
When Should You Use a 15.5 or 16-Gauge Flooring Fastener?
Many conventional solid hardwood floors use approved 15.5-gauge flooring staples or 16-gauge flooring cleats. The correct selection depends on the flooring specifications and the tool being used.
Freeman's PFL618C 3-in-1 Flooring Nailer and Stapler accepts compatible 16-gauge T-cleats, 16-gauge L-cleats, and 15.5-gauge, 1/2-inch-crown staples in lengths from 1-1/2 inches to 2 inches.
It is designed for compatible solid tongue-and-groove hardwood flooring measuring 1/2 inch to 3/4 inch thick.
Its three-in-one design gives installers the flexibility to use different approved fasteners without purchasing a separate tool for each type.
Flooring Fastener Selection Guide
| Flooring type | Fastener to investigate | Important consideration |
|---|---|---|
| Thin engineered hardwood | Compatible 18-gauge L-cleats | Verify the product's approved fastening method |
| Strand-woven bamboo | Manufacturer-approved cleats or other specified fasteners | Dense material may require a specialized fastening system |
| Solid oak flooring | Approved flooring cleats or staples | Confirm plank thickness and fastener specifications |
| Thicker solid hardwood | Compatible 15.5-gauge staples or 16-gauge cleats, where specified | Match fastener length and tool settings to the flooring |
| Floating or glue-down engineered flooring | Often no blind mechanical fastening through the tongue | Follow the specified installation method |
This chart is a starting point, not a substitute for the flooring manufacturer's installation requirements.

3. What Is the Best Flooring Nailer for Solid Oak?
The best flooring nailer for solid oak depends on the thickness of the boards, the manufacturer's fastening recommendations, and the size of your project.
Solid oak is durable, but its tongue can still split if a fastener is oversized, installed at the wrong angle, or driven with excessive force.
For compatible solid hardwood flooring, consider a dedicated flooring nailer that offers:
-
A base plate designed for your plank thickness.
-
A fastener system approved for the flooring.
-
Consistent angled fastening through the tongue.
-
A mallet-operated mechanism or other appropriate installation system.
-
A protective base plate to help prevent surface damage.
Freeman PFL618C: Versatility for Solid Hardwood
The Freeman PFL618C is a practical option for installers who want one pneumatic tool capable of handling compatible flooring cleats and staples.
Its three-in-one magazine accepts 15.5-gauge staples and 16-gauge T-cleats or L-cleats. Interchangeable no-mar base plates help accommodate compatible flooring between 1/2 inch and 3/4 inch thick.
This flexibility can be useful for residential flooring contractors who work with different approved fastening specifications from one project to another.
Before installation: Test the tool and fastener combination on spare flooring boards. Check that the fastener enters at the correct angle, holds the board securely, and does not split the tongue or damage the finished surface.
Explore the Freeman PFL618C Flooring Nailer and Stapler.

4. Can You Install Hardwood Flooring With Brad Nails?
For the main installation of a conventional nail-down tongue-and-groove hardwood floor, a standard brad nailer is generally not the right tool.
Brad nailers are designed primarily for trim, cabinetry, and other finish applications. They use small-gauge fasteners and do not provide the specialized angled fastening mechanism or appropriate fastener geometry required for most traditional hardwood flooring installations.
Using brad nails in place of specified flooring cleats or staples can result in inadequate holding power, loose boards, movement, or squeaks.
Why a Standard Finish Nailer Can Damage Flooring
A standard finish nailer may cause several problems when used for the main fastening of hardwood flooring:
1. Incorrect fastener placement
A dedicated flooring nailer is designed to position the fastener at the prescribed angle through the tongue. A finish nailer may not provide the correct angle or positioning.
2. Tongue splitting
If a fastener is too large, too long, or driven in the wrong location, it can split the tongue and compromise the board's connection to the subfloor.
3. Inadequate fastening
A finish nail may not provide the holding characteristics required by the flooring manufacturer, allowing boards to loosen over time.
4. Surface damage
An unsuitable tool or base plate can dent, scratch, or otherwise damage the finished flooring.
Brad or finish nailers may still be appropriate for specific flooring-related tasks, such as securing trim, shoe molding, or baseboards, when the correct fasteners are selected. They should not replace a dedicated flooring nailer for the primary installation unless the flooring manufacturer explicitly approves that method.

5. How Do You Set the Correct Flooring Nailer Shoe Height?
Correct shoe height is one of the most important factors in a successful hardwood flooring installation.
The shoe or base plate helps position the flooring nailer relative to the board. If the tool is not matched to the flooring thickness, the fastener can enter at the wrong angle or strike the tongue incorrectly.
Follow These Flooring Nailer Setup Steps
Step 1: Measure the flooring thickness.
Check the actual thickness of the flooring and confirm the manufacturer's installation specifications. Don't rely solely on the product's nominal size.
Step 2: Select the correct base plate.
Use the base plate or shoe specified for your flooring thickness. For example, the Freeman PF18GLCN includes three interchangeable no-mar base plates designed to accommodate compatible flooring from 3/8 inch to 3/4 inch.
The PFL618C includes two interchangeable no-mar base plates for compatible flooring from 1/2 inch to 3/4 inch.
Step 3: Check the fastener length.
A longer fastener is not automatically better. It must be suitable for the flooring and subfloor assembly and must not interfere with anything beneath the subfloor.
Step 4: Test the setup.
Before fastening the entire floor, test on a spare board. Confirm that the fastener enters through the tongue at the proper angle and seats correctly without splitting the wood or damaging the surface.
Step 5: Check the tool's operating pressure.
For pneumatic tools, stay within the operating pressure range specified by the tool manufacturer. Avoid increasing pressure simply to force a fastener into place.
Step 6: Inspect the first few rows.
Check for split tongues, proud fasteners, damaged board edges, and inconsistent fastening. Correct any setup issues before continuing.
A properly configured flooring nailer helps improve consistency, reduce installation errors, and protect the finished floor.

6. How Do You Prevent Hardwood Flooring From Buckling, Splitting, or Squeaking?
Choosing the correct fastener is only one part of a successful flooring installation. Subfloor preparation, moisture management, and installation technique also matter.
Acclimate and Prepare the Flooring Correctly
Follow the flooring manufacturer's instructions for acclimation and moisture testing. Not every flooring product requires the same acclimation process, and moisture requirements vary with the product and installation environment.
Check that the subfloor is clean, dry, structurally sound, and within the manufacturer's flatness tolerances before installation.
Allow for Required Expansion Space
Wood naturally responds to changes in moisture by expanding and contracting. Install the flooring with the perimeter expansion space required by the manufacturer.
Insufficient expansion space can contribute to buckling or compression as the flooring responds to changing environmental conditions.
Use the Correct Fastener Spacing
Follow the flooring manufacturer's specified fastening pattern and spacing. Inconsistent spacing can contribute to movement, while excessive fastening can damage the tongue or create other installation problems.
Avoid Forcing Damaged Boards Into Place
Inspect each board before installation. A split tongue or damaged groove may prevent a secure connection. Replace defective boards rather than relying on a fastener to compensate for the damage.
Investigate Squeaks Before Adding More Fasteners
Squeaking can result from subfloor movement, inadequate fastening, gaps, friction between components, or moisture-related changes. Adding more fasteners without identifying the cause may not solve the problem.
A secure, quiet floor starts with proper preparation, compatible materials, and consistent installation practices.

7. Which Freeman Flooring Nailer Should You Choose?
Freeman offers flooring tools designed for different fastening needs. The best choice depends on your flooring material, thickness, approved fastener type, and installation requirements.
Freeman PF18GLCN 18-Gauge L-Cleat Flooring Nailer
Best suited for compatible tongue-and-groove flooring from 3/8 inch to 3/4 inch thick, including certain engineered flooring and dense or exotic hardwoods.
-
Uses 18-gauge glue-collated L-cleats.
-
Accepts compatible fasteners from 1-1/4 inches to 1-3/4 inches.
-
Includes interchangeable no-mar base plates.
-
Pneumatic operation for consistent installation.
Freeman PFL618C — 3-in-1 Flooring Nailer and Stapler
A versatile option for compatible solid tongue-and-groove hardwood flooring from 1/2 inch to 3/4 inch thick.
-
Accepts compatible 15.5-gauge staples.
-
Supports 16-gauge T-cleats and L-cleats.
-
Includes interchangeable no-mar base plates.
-
Offers multiple fastening options in one pneumatic tool.
Browse Freeman Flooring Nailers to review current products and available specifications.
Should You Buy or Rent a Flooring Nailer?
If you're installing hardwood in a single room, renting may make sense depending on local rates, rental duration, and tool availability.
However, buying a flooring nailer may offer better long-term value if you expect to install flooring in multiple rooms, complete future renovations, or use the tool on professional jobs.
Consider these factors when comparing the cost of buying versus renting:
-
Project duration: Multi-day installations can make rental costs add up.
-
Future projects: A purchased tool can be reused for compatible flooring installations.
-
Convenience: Owning a tool eliminates repeated rental pickups, returns, and availability concerns.
-
Maintenance and storage: Ownership also comes with responsibility for tool care, compatible fasteners, and storage.
-
Project requirements: Compare the actual tool specifications and included accessories before deciding.
For contractors, owning the correct flooring nailer can also help reduce setup delays and provide greater control over tool availability.
Browse the Freeman Flooring Nailers Collection to compare available options for your next installation.
Frequently Asked Questions About Hardwood Flooring Fasteners
Are flooring cleats stronger than staples?
Neither is always stronger. Holding performance depends on fastener design, dimensions, flooring material, subfloor composition, and installation technique. Use the fastening system approved by your flooring manufacturer.
Can I use 18-gauge cleats on solid oak flooring?
Potentially, if the flooring manufacturer approves the specific 18-gauge cleat and the nailer is designed for that flooring. Verify the plank thickness, tongue design, and fastener specifications before installation.
What is the difference between 16-gauge and 18-gauge flooring cleats?
Gauge identifies the fastener's nominal thickness, not its length. In common fastener sizing, 16-gauge fasteners are thicker than 18-gauge fasteners. That difference affects how the fastener interacts with the flooring tongue, so the two are not automatically interchangeable.
Why is my flooring nailer splitting the tongue?
Common causes include using the wrong fastener, an unsuitable base plate, incorrect tool positioning, excessive operating pressure, or a damaged or brittle tongue. Stop installation and check the tool setup against the flooring manufacturer's instructions.
Can I use the same flooring nailer for engineered and solid hardwood?
Sometimes. The tool must support the appropriate fastener and flooring thickness, and the flooring manufacturer must approve that fastening method. A nailer suitable for one engineered floor may not be suitable for another.
Do flooring nailers work on laminate or floating floors?
Most floating laminate and floating engineered floors are installed without blind nailing through the tongue. Follow the specific flooring manufacturer's installation instructions rather than assuming a flooring nailer is appropriate.
How far apart should flooring fasteners be?
Fastener spacing varies by flooring product, plank dimensions, subfloor, and installation requirements. Follow the manufacturer's specified spacing and fastening pattern rather than applying a universal measurement.
Final Thoughts: Choose the Right Flooring Fastener Before You Start
A successful hardwood installation begins with understanding your flooring, not simply choosing the most powerful nailer or the largest fastener.
Cleats and staples can both deliver reliable results when used with compatible flooring systems. The right combination of fastener gauge, length, tool design, base plate, and installation technique helps protect the tongue-and-groove connection and supports a stable, professional-looking floor.
Whether you're a homeowner planning a seasonal renovation or a contractor installing hardwood every week, Freeman Tools provides flooring nailers and staplers designed for a range of compatible flooring applications.
Ready to find the right tool for your next flooring project? Explore the Freeman Flooring Nailers Collection and compare your options before installation begins.
Freeman Tools: Practical solutions for professionals and serious DIYers who value dependable performance, versatility, and getting the job done right.