
There is a unique hesitation that occurs right before a homeowner drops thousands of dollars on pallets of raw, beautiful solid hardwood or premium engineered flooring. The fear isn't about the investment itself; it's about the execution. We look at the pristine tongues and grooves and wonder: What if I split the wood? What if the entire floor buckles next summer? What if my lines run crooked across the room?
Here is the truth of the trade: installing hardwood flooring isn't an elite, closely guarded art form. It is a game of disciplined geometry and the right mechanical advantage. By mastering three fundamental stages—setting up expansion profiles, anchoring an unyielding first row, and deploying a pneumatic 3-in-1 flooring nailer with a rhythmic mallet strike—you can achieve a tight, flawless, squeak-free installation that outlasts your mortgage. Let’s eliminate the guesswork and step through how to lay a floor like an experienced flooring contractor.
Phase 1: The Invisible Prep Work
(Acclimation & Subfloor)

Before touching a hammer, you must respect the physics of raw timber. Wood is an organic material that breathes; it expands when relative humidity climbs and shrinks when the winter air dries out. If you pull floorboards straight from a cold delivery truck and nail them to your subfloor, the natural moisture equalization process will split, buckle, or gap your new floors within six months.
-
Acclimation: Unpack your flooring bundles and cross-stack them in the room where they will be installed. Leave them there for a minimum of 72 hours (48 hours for engineered flooring) under standard living conditions (60–80°F and 35–55% humidity).
-
Subfloor Verification: Sweep, vacuum, and inspect the subfloor. Any high spots must be sanded down; low spots must be filled or shimmed. Screw down loose sheets of plywood to eliminate subfloor rubbing, which is the root cause of 90% of household floor squeaks. Finally, roll out 15lb felt paper or a dedicated silicone vapor shield to prevent rising moisture from affecting your hardwood.
Phase 2: The Critical First Row
and the Expansion Standard

The entire room relies on your very first line of boards. If this line is crooked by even an eighth of an inch, that variance will compound exponentially across the floor, leaving you with massive gaps or wedge-shaped boards at the far wall.
Setting the Expansion Gap
You cannot run hardwood tight against drywall. Place 3/4-inch expansion spacers (or 1/2-inch for engineered wood) against the base plates of your perimeter walls. This gap will eventually be entirely concealed by your baseboard and shoe molding, but it gives the entire floor platform room to shift naturally throughout the seasons.
Snapping the Baseline
Do not trust that your wall is perfectly straight. Instead, measure out from the starter wall at both ends a distance equal to the width of your floorboard plus your expansion gap spacer. Snap a crisp chalk line between these two points. Align the tongue of your first row precisely along this chalk line, with the groove side facing the starter wall.
🛠️ Pro-Tip: Top-Nailing vs. Blind-Nailing
Because a large pneumatic flooring nailer cannot physically fit close to the wall for the first row, you must face-nail or blind-nail these starter pieces with an 18-gauge brad nailer (PBR50Q). These nails will be hidden by your baseboard later.
Phase 3: Mastering the 3-in-1
Pneumatic Flooring Nailer
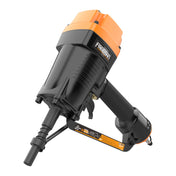
Once you are two rows away from the wall, you have the physical clearance to deploy your secret weapon: the Freeman 3-in-1 Pneumatic Flooring Nailer & Stapler (PFL618BR). This tool changes the game by combining two functions into a single movement: it compresses the floorboards tightly together while simultaneously driving a fastener at a perfect 45-degree angle directly through the pocket of the tongue.
|
Fastener Type |
Standard Gauge |
Best Applied To |
Structural Advantage |
|
T-Cleats |
16 Gauge |
3/4" Solid Exotic / Dense Hardwoods |
Provides extreme lateral shear resistance against natural expansion. |
|
L-Cleats |
16 or 18 Gauge |
3/4" Solid Oak, Maple, or Engineered Wood |
Ribbed design allows smooth wood movement without splitting tongues. |
|
Flooring Staples |
15.5 Gauge |
Standard Oak, Bamboo, Engineered Core |
Dual-pronged crown holds subfloor with immense structural pull-out strength. |
Setting Up the Tool
Adjust the base plates of your tool to match the exact thickness of your wood (e.g., 3/4", 5/8", or 1/2"). This ensures the foot of the tool rests flat on the subfloor while the driver blade lines up cleanly with the nail pocket.
Set your air compressor regulator between 70 to 110 PSI depending on the density of your timber. Test-fire into scrap pieces of your flooring: if the cleat head sits proud, bump up the pressure; if it countersinks too deep and splits the tongue, dial it back.
Phase 4: The Art of the Mallet Strike

The most common beginner error is treating the flooring mallet like a standard hammer, swinging wildly with brute force. The pneumatic flooring nailer doesn't require a heavy impact to fire; it requires an intentional, mechanical strike that serves two parallel purposes:
-
The Tightening Phase: When you place the tool’s foot against the edge of your new floorboard, the rubber-capped bumper angles outward. As your mallet swings down and strikes that bumper, the downward force translates into severe lateral pressure. It drives the board tight, closing up any natural warps or gaps between the tongue of the new piece and the groove of the previous row.
-
The Actuation Phase: The momentum of that same strike shifts an internal air valve inside the nailer, instantly releasing a concentrated burst of pneumatic pressure. The piston fires, driving and setting the cleat in a fraction of a second.
The Flooring Rhythm
Develop a steady cadence. Slide the nailer along the tongue, stagger your board end-joints at least 6 inches apart from the previous row, step firmly onto the board you are fastening to hold it flat against the subfloor, and deliver a smooth, solid blow to the rubber bumper. Do not hit it with a timid tap, or the cleat will sit proud and prevent the next board from nesting smoothly.
Phase 5: The Final Row Challenge

When you reach the opposite side of the room, you will run out of operational space for the pneumatic nailer once again. For the final two rows, you must return to face-nailing.
Measure the remaining gap to your wall spacers carefully at multiple points. Because residential walls are rarely perfectly parallel, you will likely need to rip-cut your final row of boards lengthwise down their spine using a table saw. Use a heavy-duty floor pull-bar hooked over the cut edge of the board, and tap it with your mallet to draw that final row incredibly tight into the preceding groove before top-nailing it home.
The Finish Line

Remove your expansion spacers, step back, and look down your lines. Because you took the time to snap a precise baseline and let your pneumatic tool mechanically seat every row, you are left with a monolithic, professional platform that is ready for finish sanding or immediate foot traffic.
Shop the Blog
PFL618BR - Pneumatic 3-in-1 15.5-Gauge and 16-Gauge 2" Flooring Nailer / Stapler Kit
PBR50Q - Pneumatic 18-Gauge 2" Brad Nailer with Quick Jam Release
FN18L125 - 18-Gauge 1-1/4" to 1-3/4" Glue Collated Flooring L-Cleats
FNL-2 - 16-Gauge 2" Glue Collated Flooring L-Cleats (1000 Count)
FS-151K - 15.5-Gauge 1-1/2" to 2" Glue Collated Flooring Staples with 1/2" Crown